
آپ can do that on Photoshop in case آپ didn't knew.
Please don't post this anywhere else nor claim it as your own.
Enjoy ♥
Made in Photoshop CS5
Step 1
Open Photoshop. Go to File → Open → and choose the video آپ want to screencap.
Make sure your video is .mp4 format, because if it's on another format it won't work.
Note: If a message saying "QuickTime 7.1 یا later is required" appears, don't worry. Just download QuickTime and try to open it again.
Step 2
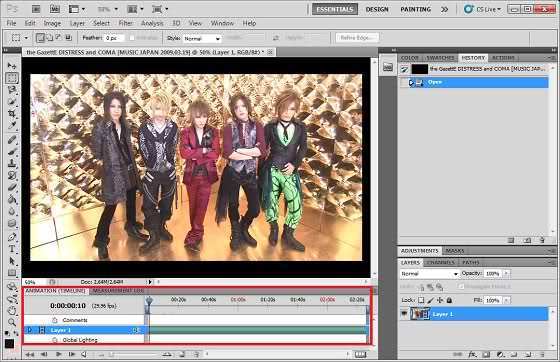
Make sure آپ see the اندازی حرکت toolbar (it has a red mark all over it, on the picture). If آپ don't see, go to Window → اندازی حرکت and it should appear.
Step 3
Now, as آپ will screencap the entire video, آپ won't need to اقدام those grey bars that are on the very left and on the very right of the اندازی حرکت toolbar, but if آپ want to screencap just a part of it, you'll need to do so.
Step 4
1. Location:
Now go to File → Export → Render Video.. and select the folder آپ want your screencaps to be in.
In my case I created a folder, otherwise they would go to the folder where your original video is.
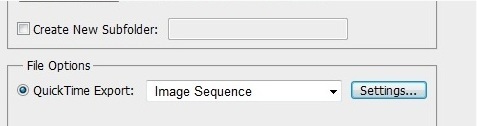
2. File option:
On here you'll have 2 export options:
- QuickTime Export
-Image Sequence
Personally, I went for QuickTime export, because if آپ select the other one, it will automatically screencap ALL video frames.
If آپ chose Quick Time too, select how you'll want the output. آپ can chose as 3gp, avi, MPEG-4, etc.., but now chose "Image sequence".

After it, click on Settings... and a new window will open
On that window, you'll chose the output format and the number of frames per second. (I chose PNG format and 2 frames per second, because the video I'm screencaping is long).
If آپ chose Image Sequence, simply select the image's output format.
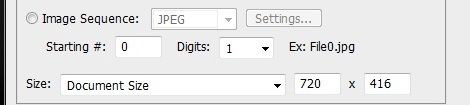
3. Size:
Chose "Document Size" (or custom, آپ decide). If آپ go for a larger size, the ایوارڈز quality, will decrease.
Now, click "Render" and photoshop should start exporting the video.
And you're done :)
Please don't post this anywhere else nor claim it as your own.
Enjoy ♥
Made in Photoshop CS5
Step 1
Open Photoshop. Go to File → Open → and choose the video آپ want to screencap.
Make sure your video is .mp4 format, because if it's on another format it won't work.
Note: If a message saying "QuickTime 7.1 یا later is required" appears, don't worry. Just download QuickTime and try to open it again.
Step 2
Make sure آپ see the اندازی حرکت toolbar (it has a red mark all over it, on the picture). If آپ don't see, go to Window → اندازی حرکت and it should appear.

Step 3
Now, as آپ will screencap the entire video, آپ won't need to اقدام those grey bars that are on the very left and on the very right of the اندازی حرکت toolbar, but if آپ want to screencap just a part of it, you'll need to do so.
Step 4
1. Location:
Now go to File → Export → Render Video.. and select the folder آپ want your screencaps to be in.
In my case I created a folder, otherwise they would go to the folder where your original video is.
2. File option:
On here you'll have 2 export options:
- QuickTime Export
-Image Sequence
Personally, I went for QuickTime export, because if آپ select the other one, it will automatically screencap ALL video frames.
If آپ chose Quick Time too, select how you'll want the output. آپ can chose as 3gp, avi, MPEG-4, etc.., but now chose "Image sequence".
After it, click on Settings... and a new window will open
On that window, you'll chose the output format and the number of frames per second. (I chose PNG format and 2 frames per second, because the video I'm screencaping is long).
If آپ chose Image Sequence, simply select the image's output format.
3. Size:
Chose "Document Size" (or custom, آپ decide). If آپ go for a larger size, the ایوارڈز quality, will decrease.

Now, click "Render" and photoshop should start exporting the video.
And you're done :)

Made in: Adobe Photoshop CS5
Don't claim as your own.
Enjoy ♥
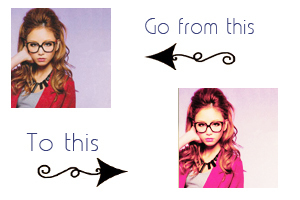
1. Find your image and crop it to 100x100.
Then go to Layer → New Adjustment layer → Selective Coloring:
Yellow: -61
2.Layer → New Adjustment layer → Curves:
Output: 54 Input: 79
Output: 189 Input: 161
3.Layer → New Adjustment layer → Color Balance:
Shadows:
Magenta: +10
Yellow: +10
4.Layer → New Adjustment layer → Color Balance:
Midtones:
Cyan: +45
5.Layer → New Fill layer → Solid color:
Color: #f2d798
Mode:Multiply
Opacity: 21%
6.Layer → New Adjustment layer → Selective color:
Cyan: -72
Magenta: +5
Yellow: -32...
continue reading...
Don't claim as your own.
Enjoy ♥
1. Find your image and crop it to 100x100.
Then go to Layer → New Adjustment layer → Selective Coloring:
Yellow: -61
2.Layer → New Adjustment layer → Curves:
Output: 54 Input: 79
Output: 189 Input: 161
3.Layer → New Adjustment layer → Color Balance:
Shadows:
Magenta: +10
Yellow: +10
4.Layer → New Adjustment layer → Color Balance:
Midtones:
Cyan: +45
5.Layer → New Fill layer → Solid color:
Color: #f2d798
Mode:Multiply
Opacity: 21%
6.Layer → New Adjustment layer → Selective color:
Cyan: -72
Magenta: +5
Yellow: -32...